August 28, 2009
Translate page in your language.
Here in my blog you can read the post in your known languages. This is possible with the help of Bing Translator.
It provides languages such as,
Arabic,
Chinese Traditional,
Chinese Simplified,
Dutch,
French,
Germen,
Hebrew,
Italian,
Japanese,
Korean,
Polish,
Portugese,
Russian,
Spanish.
So there is no language restrication and every user can read the post and get information.
If any one wants to use this check on my blog the feature Bing Translator.
August 25, 2009
Business Data List Connector
The following list of Databases are also connect using this feature : Microsoft SQL Server, Oracle, MySQL, Informix, DB2 etc, Microsoft Office data like Excel, Access or even text data files. Btw. connection strings are available for external SharePoint lists too...
This is free evalution version you have to register on Layer2 and able to download.
Click here to learn more...
List the Blogs on Bloggers.Com
Many people write there blogs such as Sharepoint Blog, ASP.Net Blog, and others. Sometimes it is difficult to remember those blog names. So google provides the API for this.
It will provide Owner Name, Link to profile and list of all the blogs that owner has.
If you wants to try this yourself use the following Script.
<script src="http://www.google.com/jsapi" type="text/javascript"></script>
<script type="text/javascript">
google.load("gdata", "1.x", { packages : ["blogger"] });
</script>
<script type="text/javascript">
function _run()
{
/* Retrieve a list of blogs */
// Obtain a reference to the 'content' div
var content = document.getElementById('content');
// Create the blogger service object
var bloggerService = new google.gdata.blogger.BloggerService('com.appspot.interactivesampler');
// The default "metafeed" feed is used to retrieve a list of blogs for a particular logged-in user.
// The ID included in this URI can be retrieved from the <link rel="me"> element in the Blog's HTML source
// Hightlighted ID has to be changed as per the blog.
var feedUri = 'http://www.blogger.com/feeds/16112369086732751558/blogs';
// The callback method invoked when getBlogFeed() returns feed data
var handleBlogFeed = function(blogFeedRoot) {
// Display Blogger Profile data
var author = blogFeedRoot.feed.getAuthors();
var authorName = author[0].getName().getValue();
var authorUri = author[0].getUri().getValue();
// This variable will buffer HTML output until execution is complete
var html = '<h1>Blogger User</h1>'
+ '<h2>Profile Information</h2>'
+ '<dl>'
+ '<dt>Profile Name:</dt>'
+ '<dd>' + authorName + '</dd>'
+ '<dt>Profile Name:</dt>'
+ '<dd><a href="' + authorUri + '">' + authorUri + '</a></dd>';
// Fetch blogs associated with this Blogger Profile
html += '<h2>Blog List</h2>';
var blogEntries = blogFeedRoot.feed.getEntries();
// Has the user created any blogs?
if(!blogEntries.length)
{
html += '<p>First <a href="http://www.blogger.com" '
+ 'target="_blank">create a blog</a>.</p>';
}
else
{
// Print list of blogs
html += '<table rules="groups">'
+ '<thead><tr>'
+ '<th>Blog Name/Link</th><th>Last Updated</th>'
+ '</tr></thead>'
+ '<tbody>';
for (var i = 0, blogEntry; blogEntry = blogEntries[i]; i++)
{
var blogTitle = blogEntry.getTitle().getText();
var blogURL = blogEntry.getHtmlLink().getHref();
var blogUpdated = blogEntry.getUpdated().getValue().getDate();
html += '<tr>'
+ '<td><a href="' + blogURL + '" target="_blank">'
+ blogTitle
+ '</a></td>'
+ '<td>' + blogUpdated + '</td>'
+ '</tr>';
}
html += '</tbody>'
+ '</table>';
};
// Output buffered HTML and clear 'Loading...' messagecontent.innerHTML = html;
};
// Error handler called when getBlogFeed() produces an error
var handleError = function(error)
{
content.innerHTML = '<pre>' + error + '</pre>';
};
// Submit the request using the blogger service object
bloggerService.getBlogFeed(feedUri, handleBlogFeed, handleError);
}
google.setOnLoadCallback(_run);
</script>
<body style="font-family: Arial;border: 0 none;">
<div id="content" style="width:100%;">Loading...</div>
</body>
August 24, 2009
Deploying Web Parts in Windows SharePoint Services
There are two primary locations within a SharePoint site where you can deploy a Web Part assembly.
1) bin directory — The bin directory is a folder stored in your Web application root directory. The location of this folder is determined when the Web site is created in Internet Information Services (IIS). In Windows SharePoint Services, this can happen either through the SharePoint 3.0 Central Administration site, or by manually creating a new Web site in IIS manager.
Important: If a bin directory does not exist you must add one manually. Do not store Web Parts in the local _app_bin directory, which is reserved for use by Microsoft.
For more information, see How to: Find the Web Application Root
2) global assembly cache — A global location where signed assemblies can be deployed. The global assembly cache enables you to share assemblies across numerous applications. The global assembly cache is automatically installed with the .NET runtime. Components are typically stored in C:\WINNT\Assembly.
1) bin directory :
Advantages : Assemblies run with partial trust, by default. Code that runs from this directory has a low level of code access security (CAS) permissions. Because administrators must explicitly raise permissions that have been granted to a Web Part so it can function properly, they often prefer that assemblies run in the bin directory with a known set of required CAS permissions.A bin directory is specific to a Web application. This makes it possible to isolate code to a particular Web application.
Disadvantage : In order for the Web Part to run in multiple Web applications, you must deploy it to the global assembly cache.
2) global assembly cache :
Advantages : Assemblies run with full trust by default. They are globally installed, so they will work in any Web application. The global assembly cache can contain multiple versions of the same assembly.
Disadvantage : Generally no CAS restrictions on code installed to the global assembly cache; therefore, you lose the defense-in-depth security benefit.Also, an assembly deployed to the GAC is cached, so if the assembly is rebuilt, it is not automatically updated on the SharePoint site. You must force Windows SharePoint Services to reload the assembly by resetting Internet Information Services (IIS).
Security Permissions Considerations:
There are two ways to elevate permissions:
a) Recommended method — Create a new trust policy file and point your web.config file at the new file. This option is more complicated but it gives you a precise attribution of permissions for your Web Parts.
For more information about trust policy files, see Securing Web Parts in Windows SharePoint Services.
b) Optional method — Raise the net trust level of the bin directory. In the web.config file in the Web application root, there is a tag called
Strong naming uses a private key to digitally sign an assembly. Strong naming also stamps the assembly with a public key to validate the signature. This technique guards against unauthorized versions of a Web Part. If the public key fails to validate the digital signature, Windows SharePoint Services will refuse to run the module.
When deploying a Web Part to the bin, the recommend practice is to strong name the assembly. When deploying a Web Part to the Global Assembly Cache, the assembly must have a strong name. An assembly without a strong name is not recommended in Windows SharePoint Services.
For more information: Click Here
August 21, 2009
Configure Multiple Languages in MOSS
Step 2: Install Office SharePoint Server 2007
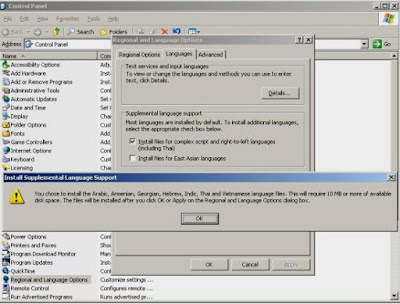
Now you need to install the language pack of the desired language. Please note that language packs come in separate packages i.e. one language pack setup per installation, so if you need more than one language, multiple language packs need to be installed. Make sure the language pack is of the same language you need and you are installing the 'MOSS language pack' and not one of the 'WSS language packs'
Step 4: Rerun the SharePoint Products and Technologies Configuration Wizard
As soon as you successfully install a language pack in a particular language, a folder with the respective language ID is created in c:\Program Files\Common Files\Microsoft Shared\web server extensions\12\template\ For example: If you are currently running the English version of MOSS and you install the Arabic language pack, you will now find two folders in this hierarchy, one is 1033 (for English- the default language) and the other is 1025 (the Arabic language).
2) Click 'Variations'
3) Select '/' to create variations for the top level site
4) Leave all other options to default settings and Click 'OK'
1) Go to Site Settings->Site Collection Administration
2) Click 'Variation Labels'
3) On the' Variation Labels' screen, click 'New Label' and create an English label
2) The wizard automatically creates hierarchies for sites and sub sites and pairs them as well.
2) Click 'Variation Logs'
3) Look at the Variation Log Entries and find the pairing of sites
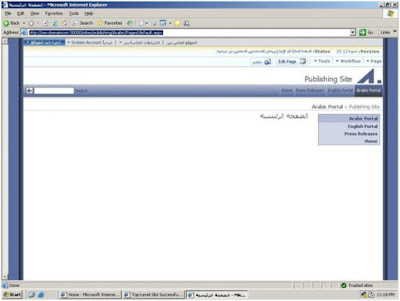
One more thing to note is that if you use the default URL of the site, you will be redirected to the variation that corresponds to the default language of the browser. Try changing the browser language to Arabic and check. This shows that you can redirect different users to the same site in different languages based on user preferences.
You are now ready to go with multilingual sites created in MOSS. Try to add some content to the content editor web part by using the Edit Page option. After the change, don't forget to Publish.
August 20, 2009
Disable the Source Menu Option in Internet Explorer
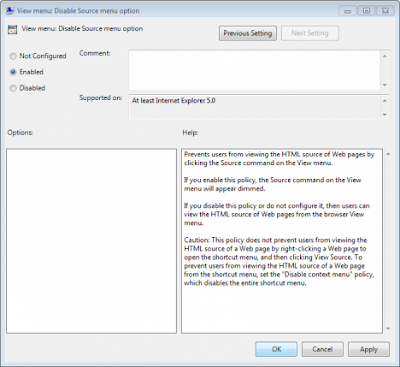
If you disable this policy or do not configure it, then users can view the HTML source of Web pages from the browser View menu.
Caution: This policy does not prevent users from viewing the HTML source of a Web page by right-clicking a Web page to open the shortcut menu, and then clicking View Source. To prevent users from viewing the HTML source of a Web page from the shortcut menu, set the "Disable context menu" policy, which disables the entire shortcut menu.
1) Type gpedit.msc in the Start menu’s search box and then press Enter.
Note: This guide shows you how to make changes to Windows 7 using Group Policy. Group Policy is not available in Home versions of Windows 7.
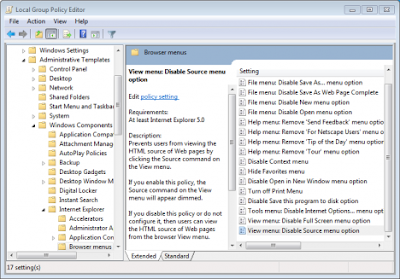
2)Navigate to User Configuration, Administrative Templates, Windows Components, Internet Explorer, and then select Browser menus in the left column of the Group Policy editor.
3) Double-click View menu: Disable Source menu option in the Settings section of the Group Policy editor.
4)Select Enable and then click OK to save the changes.
August 14, 2009
Search Images on basis of Color.
The code for this is as follows,
<script src="http://www.google.com/jsapi?key=ABQIAAAA1XbMiDxx_BTCY2_FkPh06RRaGTYH6UMl8mADNa0YKuWNNa8VNxQEerTAUcfkyrr6OwBovxn7TDAH5Q"></script>
<script type="text/javascript">
/*
* How to search for images and filter them by color.
*/
google.load('search', '1');
function OnLoad() {
var searchControlDiv = document.getElementById("content");
var control = new GSearchControl();
control.setResultSetSize(GSearch.LARGE_RESULTSET);
control.setLinkTarget(GSearch.LINK_TARGET_PARENT);
var options = new GsearcherOptions();
options.setExpandMode(GSearchControl.EXPAND_MODE_OPEN);
var isearcher;
var colors = [
GimageSearch.COLOR_RED,
GimageSearch.COLOR_ORANGE,
GimageSearch.COLOR_YELLOW,
GimageSearch.COLOR_GREEN,
GimageSearch.COLOR_TEAL,
GimageSearch.COLOR_BLUE,
GimageSearch.COLOR_PURPLE,
GimageSearch.COLOR_PINK,
GimageSearch.COLOR_WHITE,
GimageSearch.COLOR_GRAY,
GimageSearch.COLOR_BLACK,
GimageSearch.COLOR_BROWN
];
for (var i=0; i < colors.length; i++) {
var colorSearcher = new google.search.ImageSearch();
colorSearcher.setRestriction(GimageSearch.RESTRICT_COLORFILTER,
colors[i]);
var colorName = colors[i].substring(0,1).toUpperCase() + colors[i].substring(1);
colorSearcher.setUserDefinedLabel(colorName);
control.addSearcher(colorSearcher, options);
};
// tell the searcher to draw itself and tell it where to attach
var drawOptions = new google.search.DrawOptions();
drawOptions.setDrawMode(google.search.SearchControl.DRAW_MODE_TABBED);
control.draw(searchControlDiv, drawOptions);
control.execute("");
}
google.setOnLoadCallback(OnLoad);
</script>
<style type="text/css" media="screen">
body, table, p{
background-color: white;
font-family: Arial, sans-serif;
font-size: 13px;
}
.gsc-trailing-more-results {
display : none;
}
.gsc-resultsHeader {
display : none;
}
.gsc-results {
padding-left : 20px;
}
.gsc-control {
width : 800px;
}
.gsc-tabsArea {
margin-bottom : 5px;
}
</style>
</head>
<body style="font-family: Arial;border: 0 none;">
<div id="content"> Loading...</div>
</body>
August 11, 2009
Enlarge Image on Mouse Move.
At start the image is look like as,
and on mouse move on the image the image will enlarge as,
The code for this is ,
Place the Style tag in head Section of page.
<style type="text/css">
img.expando
{
border: none;
vertical-align: top;
}
</style>
Place the following code in body section.
<img class="expando" border="0" src="Grow.jpg" width="100" height="80">
<Script type="text/javascript">
if (document.images)
{
(function()
{
var cos, a = /Apple/.test(navigator.vendor), times = a? 20 : 40, speed = a? 40 : 20;
var expConIm = function(im)
{
im = im window.event;
if (!expConIm.r.test (im.className))
im = im.target im.srcElement null;
if (!im !expConIm.r.test (im.className))
return;
var e = expConIm,
widthHeight = function(dim)
{
return dim[0] * cos + dim[1] + 'px';
},
resize = function()
{
cos = (1 - Math.cos((e.ims[i].jump / times) * Math.PI)) / 2;
im.style.width = widthHeight (e.ims[i].w);
im.style.height = widthHeight (e.ims[i].h);
if (e.ims[i].d && times > e.ims[i].jump)
{
++e.ims[i].jump;
e.ims[i].timer = setTimeout(resize, speed);
}
else if (!e.ims[i].d && e.ims[i].jump > 0)
{
--e.ims[i].jump;
e.ims[i].timer = setTimeout(resize, speed);
}
},
d = document.images, i = d.length - 1;
for (i; i > -1; --i)
if(d[i] == im) break;
i = i + im.src;
if (!e.ims[i])
{
im.title = '';
e.ims[i] = {im : new Image(), jump : 0};
e.ims[i].im.onload = function()
{
e.ims[i].w = [e.ims[i].im.width - im.width, im.width];
e.ims[i].h = [e.ims[i].im.height - im.height, im.height];
e (im);
};
e.ims[i].im.src = im.src;
return;
}
if (e.ims[i].timer) clearTimeout(e.ims[i].timer);
e.ims[i].d = !e.ims[i].d;
resize ();
};
expConIm.ims = {};
expConIm.r = new RegExp('\\bexpando\\b');
if (document.addEventListener)
{
document.addEventListener('mouseover', expConIm, false);
document.addEventListener('mouseout', expConIm, false);
}
else if (document.attachEvent)
{
document.attachEvent('onmouseover', expConIm);
document.attachEvent('onmouseout', expConIm);
}
})();
}
</script>
Spotlight On Image.
Copy the style in head section on page.
<style type="text/css">
#myimage
{
filter:light
}
</style>
And Then Copy the following section in body section,
<img id="myimage" src="Grow.jpg" />
<script type="text/javascript" language="javascript">
s = 100; // the size of the spotlight
vp = 10; // the visibility percent of the picture
startx = 0; // the top position of your sportlight into the image (on start)
starty = 0; // the left position of your spotlight into the image (on start)
var IE = document.all?true:false
function moveL()
{
xv = tempX;
yv = tempY;
myimage.filters.light.MoveLight(1,xv,yv,s,true);
}
if (IE&&myimage.filters)
document.all.myimage.onmousemove = getMouseXY;
var tempX = 0
var tempY = 0
function getMouseXY(e)
{
tempX = event.offsetX
tempY = event.offsetY
if (tempX < 0) {tempX = 0} if (tempY < 0) {tempY = 0} if (t) { moveL(); } return true } var xv = startx; var yv = starty; var t= true; if (IE&&myimage.filters) { myimage.style.cursor="hand"; myimage.filters.light.addAmbient(255,255,255,vp) myimage.filters.light.addPoint(startx,starty,s,255,255,255,255) } </script>
Disable Right Click On Images.
The Following script is used to Disable the right click on all Images which are present on your site.
If you are working on Sharepoint site place this script on MasterPage, Otherwise on page on which you want to disable right click on images. But It will disable right click on all the Images for site/page.
<script language="JavaScript">
var clickmessage="Right click disabled on images!"
function disableclick(e)
{
if (document.all)
{
if (event.button==2event.button==3)
{
if (event.srcElement.tagName=="IMG")
{
alert(clickmessage);
return false;
}
}
}
else if (document.layers)
{
if (e.which == 3)
{
alert(clickmessage);
return false;
}
}
else if (document.getElementById)
{
if (e.which==3&&e.target.tagName=="IMG")
{
alert(clickmessage)
return false
}
}
}
function associateimages()
{
for(i=0;i
}
if (document.all)
document.onmousedown=disableclick
else if (document.getElementById)
document.onmouseup=disableclick
else if (document.layers)
associateimages()
</script>
August 7, 2009
English To Hindi / Marathi / Gujarati Translator.
Many of us are facing problem how to translate the English word in Hindi or Marathi or Gujarati, so google provides the solution as,
The Google provides the API and scripts, as follows.
<script src=http://www.google.com/jsapi?key=ABQIAAAA1XbMiDxx_BTCY2_FkPh06RRaGTYH6UMl8mADNa0YKuWNNa8VNxQEerTAUcfkyrr6OwBovxn7TDAH5Q>
</script>
<script type="text/javascript">
google.load("elements", "1",
{
packages: "transliteration"
});
function OnLoad()
{
var content = document.getElementById('content');
// Create the HTML for our text area
content.innerHTML = ' <div>Type a word and hit space to get it in Hindi. '
+'Click on a word to see more options.</div>'
+'<textarea id="transliterateTextarea" rows="5" cols="100"></textarea>'
+' <div>Type in (do not copy/paste): '
+'<b>namaste main yahan apke madad karane ke liye hun</b></div>';
var options =
{
sourceLanguage:
google.elements.transliteration.LanguageCode.ENGLISH,
destinationLanguage:
[google.elements.transliteration.LanguageCode.HINDI], // Hindi, Marathi, Gujarati.
shortcutKey: 'ctrl+g',
transliterationEnabled: true
};
// Create an instance on TransliterationControl with the required
// options.
var control = new google.elements.transliteration.TransliterationControl (options);
// Enable transliteration in the textbox with id
// 'transliterateTextarea'.
control.makeTransliteratable(['transliterateTextarea']);
}
google.setOnLoadCallback(OnLoad);
</script>
<body style="font-family: Arial;border: 0 none;"> </body>
August 5, 2009
SharePoint’s Branding Limitations
Style for Webparts
<Style>
.ms-WPBorder
{
border-right:#6C1717 1px solid;
border-left:#6C1717 1px solid;
border-top:blue 2px groove;
border-bottom:#6C1717 1px solid;
}
.ms-PartSpacingVertical, .ms-PartSpacingHorizontal
{
padding-top:1px;
}
.ms-WPHeader
{
Color:#FFF;background-image:url ('images/topshape.jpg');
}
.ms-WPTitle span
{
font-weight:bold;
font-size:13px;
font-family:Arial, Helvetica, sans-serif;
text-decoration:none;
margin-left:8px;
Color:#3366FF;
}
</Style>