November 26, 2009

Content posters for Microsoft SharePoint Server 2010 !

Hi All I found some important Posters for SharePoint 2010... on blogs.technet.com

Services : Services architecture, including and common ways to deploy services in your overall solution design.

Download: Visio, PDF, XPS

Cross-farm Services : Illustrates how to deploy services across farms to provide centralized administration of services.

Download: Visio, PDF, XPS

Topologies for SharePoint Server 2010 : Describes common ways to build and scale farm topologies, including planning which servers to start services on.

Download: Visio, PDF, XPS

Hosting Environments in SharePoint Server 2010 : Summarizes the support for hosting environments and illustrates common hosting architectures.

Download: Visio, PDF, XPS

Business Connectivity Services Model : This model poster describes the architecture of Microsoft Business Connectivity Services in SharePoint Server 2010 and provides information about how to create solutions that are based on the service. Use this model with the following article: Business Connectivity Services overview (SharePoint Server 2010)

Download: Visio, PDF, XPS

SharePoint 2010 Upgrade Planning : This model covers planning for an upgrade from Microsoft Office SharePoint Server 2007 to SharePoint Server 2010. It includes information about the following:

  • Upgrade requirements: Hardware, operating system, and database
  • Upgrade process: specific steps to follow before, during, and after the upgrade
    Use this model with the following article: Upgrading to SharePoint Server 2010

Download: Visio, PDF, XPS

SharePoint Server 2010 Upgrade Approaches : This model helps you understand the in-place, database attach, and hybrid approaches to upgrading from Office SharePoint Server 2007 to SharePoint Server 2010.

  • See the farm topologies before, during, and after upgrade
  • Compare the advantages of each type of upgrade approach

Use this model with the following articles:

Download: Visio, PDF, XPS

SharePoint Server 2010 — Test Your Upgrade Process : This model explains the methodology for testing the upgrade process before upgrading from Office SharePoint Server 2007 to SharePoint Server 2010.

  • Understand the goals for testing your upgrade process: customizations, hardware,
    timing, planning
  • See specific steps to follow for testing your upgrade process

Use this model with the following article: Use a trial upgrade to find potential issues (SharePoint Server 2010)

Download: Visio, PDF, XPS

SharePoint Server 2010 — Services Upgrade : This model covers upgrading services from Office SharePoint Server 2007 to SharePoint Server 2010.

  • Considerations for specific services: Personalization, Search, InfoPath Forms, Excel,
    Business Data Catalog, Single Sign-on
  • In-place upgrade with services
  • Database attach upgrade with services

Download: Visio, PDF, XPS

Choose a tool for business intelligence in SharePoint Server 2010 : This model covers an overview of business intelligence in SharePoint Server 2010 and provides you with the following information.

  • An overview of each business intelligence service and when you might use the service.
  • Architecture for application of the business intelligence services and how they
    work together in a topology.
  • A list of possible data sources for each business intelligence service.


Download: Visio, PDF, XPS

October 12, 2009

Open Microsoft Application from SharePoint using Javascript

Hi All,

I have some requirments that to open MS-Word, MS- Excel , MS-PowerPoint and MS- Outllook applications from SharePoint enviornment.

This is possible by using "Process" Class in System.Diagonostics as

Process wordApp = new Process();
wordApp.StartInfo.FileName= "WinWord.exe";
wordApp.Start();


But the problem in SharePoint is the Process is started but with the Credentials of "Network Services" so the word application is not visible.
The above solution is working in any normal ASP.Net web application but not in SharePoint. So we try a work around as use javascript and create ActiveX objects and Pass the Application Name as arguments.


TheCode is as ...
For MS-Word Application.

var WordApplication=new ActiveXObject("Word.Application");
WordApplication.Visible=true; // "Visible" is in the Word Object Model
WordApplication.Documents.Add();


For MS-Excel Application.


var ExcelApplication=new ActiveXObject("Excel.Application");
ExcelApplication.Visible=true; // "Visible" is in the Excel Object Model
ExcelApplication.Workbooks.Add();


For MS-PowerPoint Application.

var PPTApplication=new ActiveXObject("Powerpoint.Application");
PPTApplication.Visible=true; // "Visible" is in the PowerPoint Object Model
PPTApplication.Presentations.Add();


For MS-OutLook Application.

var objO = new ActiveXObject('Outlook.Application');
var objNS = objO.GetNameSpace('MAPI');
var olInbox = objNS.GetDefaultFolder(6);
olInbox.Display();


Try this code in Script.


Prerequsite :


There some prerequsites for this application,
  1. The application is installed at client machine, because it will open client local application but not on servers application.
  2. There is settings for running this scripts as,
Tools > Internet Options… > choose tab Security > click button Custom level > scroll > to 'Run ActiveX controls and plug-ins' > select ‘prompt’ or ‘enable’.

October 8, 2009

Programmatically Adding, Deleting, Copying and Downloading Attachments in SPList

I developed a new functionality in our application where I worked with attachments in SharePoint Lists programmatically… It was a nice learning… Let me share my experiences with that too………… And now I seem to have found an informative stuff for my readers and an apt title too

ADDING AN ATTACHMENT TO AN ITEM IN SPLIST :

private void AddNewAttachment(int NodeID)
{
try
{
SPList myList = SPContext.Current.Web.Lists["Item List"];SPListItem myNewItem = myList.GetItemById(NodeID);
if (fileUpload.PostedFile != null && fileUpload.HasFile)
{
Stream fStream = fileUpload.PostedFile.InputStream;
byte[] contents = new byte[fStream.Length];fStream.Read(contents, 0, (int)fStream.Length);fStream.Close();fStream.Dispose();
SPAttachmentCollection attachments = myNewItem.Attachments;string fileName = Path.GetFileName(fileUpload.PostedFile.FileName);attachments.Add(fileName, contents);
myNewItem["Attached FileName"] = fileName; // store the name of the file in a column for future requirements
myNewItem.Update();
}
}
catch (Exception eAdd)
{
string errAdd = eAdd.Message;
}
}


DELETING AN ATTACHMENT FROM SPLIST :


private void DeleteAttachment(int NodeID)
{
try
{
SPList myList = SPContext.Current.Web.Lists["Item List"];
SPListItem delItem = myList.GetItemById(NodeID);
SPAttachmentCollection atCol = delItem.Attachments;
if (delItem["Attached FileName"] != null)
{
string strFileName = delItem["Attached FileName"].ToString();
delItem["Attached FileName"] = string.Empty;
atCol.Delete(strFileName);
delItem.Update();
}
}
catch (Exception eDel)
{
string errDel = eDel.Message;
}
}


DOWNLOADING THE ATTACHMENT :
Find the download link first then reedirect to another aspx page so that the response ending on the current page does not affect the functionalities on this :-

private void DownloadAttachment(int NodeID)
{
try
{
string AttachmentURL = string.Empty;
SPList myList = SPContext.Current.Web.Lists["Item List"];
SPListItem attItem = myList.GetItemById(NodeID);
if (attItem["Attached FileName"] != null)
{
AttachmentURL = “/Lists/Item%20List1/Attachments/” + NodeID.ToString() + “/” + attItem["Attached FileName"].ToString();

System.Web.HttpContext.Current.Session["FileName"] = attItem["Attached FileName"].ToString();
System.Web.HttpContext.Current.Session["Attachment"] = AttachmentURL.Trim();
}
else
{
lblReport.Text = GetMessage(110);
}
if (AttachmentURL != string.Empty)
Page.Response.Write(”");
}
catch (Exception eDwn)
{
string errDwn = eDwn.Message;
}
}
At the aspx page you need to run the code as :

if(System.Web.HttpContext.Current.Session["Attachment"] != null)
{
string strName = System.Web.HttpContext.Current.Session["FileName"].ToString();
string sbURL = System.Web.HttpContext.Current.Session["Attachment"].ToString();
System.Web.HttpResponse response;
response = System.Web.HttpContext.Current.Response;
System.Web.HttpContext.Current.Response.ContentEncoding = System.Text.Encoding.Default;
response.AppendHeader(”Content-disposition”, “attachment; filename=” + strName);
response.AppendHeader(”Pragma”, “cache”);
response.AppendHeader(”Cache-control”, “private”);
response.Redirect(sbURL);
response.End();
}

Now set these sessions to null.


COPYING AN ATTACHMENT FROM ONE ITEM TO ANOTHER IN SPLIST :
private void CopyAttachment(int FromID, int NodeID, string AttachedFile)
{
try
{
SPList myList = SPContext.Current.Web.ParentWeb.Lists["Item List"];
SPListItem myItem = myList.GetItemById(NodeID);
SPListItem myPrevItem = myList.GetItemById(FromID);

SPAttachmentCollection attColl = myPrevItem.Attachments;

SPFile attFile = myPrevItem.ParentList.ParentWeb.GetFile(myPrevItem.Attachments.UrlPrefix + AttachedFile);
string fileRead = myPrevItem.Attachments.UrlPrefix.ToString() + AttachedFile;

StreamReader fsReader = new StreamReader(attFile.OpenBinaryStream());
Stream fStream = fsReader.BaseStream;

byte[] contents = new byte[fStream.Length];
fStream.Read(contents, 0, (int)fStream.Length);
fStream.Close();
fStream.Dispose();

myItem.Attachments.Add(AttachedFile, contents);
myItem.Update();
}
catch (Exception eCopy)
{
string errCopy = eCopy.Message;
}
}


No exact match found when adding using from different domains in SharePoint

Problem:

Either when you’re trying to add a user account from a different domain to a SharePoint site collection or using People Picker you get a “no exact match found”.

Issue:

The service account attached to the Sharepoint Web Application is used for user account verification. In the case where there is only a one-way trust between the domains, a login for the requested domain is required. For example, when you add a user from a different domain to the security list for a file, where the current login does not have permissions to the queried domain a login popup appears. Since a login dialog doesn’t appear for Sharepoint, an additional login is required.

Solution:

In a multi forest network, separate logins will have to be registered against each domain. Assuming you have a login with permissions to the domains that are found in different forests you can run the following command on the Sharepoint server to register the login password (domain:, login, password; domain, login, password):

stsadm.exe -o setproperty -url “<https://SharepointPortal>” -pn “peoplepicker-searchadforests” -pv “domain:na.aecomnet.com,na\mosssp,Password; domain:as.aecomnet.com,nas\mossspas,Password; domain:corp.aecomnet.com,aecom/mossspcorp,Password; domain:au.aecomnet.com,au\mosstest,mos5test”

Deploying .NET Assemblies

I thought I’d cover the intricacies of deploying .NET Dll’s in production and development environments today. One of a developers’ first tasks after creating an assembly is deciding the location to house their newly creating endeavour. The three main ways are

1. Global Application Cache (GAC)
2. Private Assemblies
3. Codebase


Global Application Cache


Storing your assembly in the “Global Application Cache” (GAC) , allows your assemblies functionality to be utilized across several different applications. Once the assembly is in the GAC, the CLR (by default) will search this universal location for the applicable assembly.It is the first location the CLR will search for assemblies.

The location of the GAC is C:\Windows\Assemblies\GAC. There are a number of ways to deploy your assembly to the GAC. The main way is by calling the command line utility GACUtil.exe

Advantages:
1. Shared between applications.
2. Eliminates dependency on relative/absolute path referencing correctness.
3. Small load performance boost (Load time strong naming verification not required as it’s a pre-requisite for GAC deployment) .

Disadvantages:
1. Requires at least power user access control to deploy to GAC.
2. Requires assembly strong naming.

Private Assemblies

The developer’s application directory is also know as the ApplicationBase, and is the private location where the CLR searches for assemblies.

Advantages:
1. XCopy deployment (copy application assemblies, config files to a single location for deployment)
2. Flexible options in strong/weak naming and user installation access control

Disadvantages
1. Cannot share private assemblies between applications


Codebase

This property allows the developer to specify a location to find an assembly (e.g. relative paths or web download). If the assembly is downloaded from the network then the assembly is copied and loaded from a location known as the download cache. Note that this location is not the same location as the GAC and hence does not provide the same capabilities such as assembly sharing.

Advantages:
1. Obtain the assemblies over the network
2. Not restricted to ApplicationBase structure

Disadvantages:
1. Important to get correct directory in config file.


September 17, 2009

How to get Image path of Type column in document library

Hi All,

Today i found one very interesting thing. I thought it may help you a lot in many cases.

I was developing webpart which functions like this.

I have document library and in that Document Library i have one column which specially identified a ContactID from other List. When i add that contact i also take the attachment and put it in that document library, so first when i get that ContactID (ID of the contact listItem), i insert a row in that document library with Contact ID in the ContactID column in that document library.

This post is not regarding this, but would be one of the scenario to explain what i am now about to tell you.

I also needed the icon with each respective documents. If the document is Docx, i needed to show the docx icon which sharepoint puts in Type column in Document Library. same goes for any files. Doc,Docx,XML,Xls,Xlsx,ppt etc.

so i wonder how sharepoint manages this, i tried to take the ListItem of the document library and tried to see that any of the Field gives the icon path or not. But no, none of the fields returns me the Icon of the path, or even none of the Field tells us that it uses which icon. I search a bit, then i found that everything is in one Field which is called "DocIcon".

So assume that you have document library called "Shared Documents".

---------------------------------------------------------------------------------------------
SPDocumentLibrary objDocLib =(SPDocumentLibrary)SPContext.Current.Web.Lists["Shared Documents"];
---------------------------------------------------------------------------------------------

Now, Lets say i am taking the First Document,SPListItem objItem = objDocLib.GetItemById(1); // Make sure you have at least one doc, otherwise this will give ErrorNow,

Check for this condition,

---------------------------------------------------------------------------------------------
if (objItem["DocIcon"] == null)
---------------------------------------------------------------------------------------------

Because if sharepoint images does not have supporting type icon for that document type, lets say any file without any extesnion, this field will return you null. so first check this. now proceed.

---------------------------------------------------------------------------------------------
string strFileType= Convert.ToString(objItem["DocIcon"]);
---------------------------------------------------------------------------------------------

This returns you the type (it returns doc,docx,ppt,xls,xlsx,xml etc). So from here you can come to know what is the type of the document.

Now, interesting part comes. you must be wondering that OK, that is fine, but where is the icon path?

Here is a trick that i found,

Check the Images Folder inside C:\Program Files\Common Files\Microsoft Shared\web server extensions\12\TEMPLATE\IMAGES.

Now Check you will find all the icons which sharepoint uses have .gif extension and all these icons have IC prefix with the extension and plus .gif at last. So have you got any hint? No??? no, problem, here we go. Check this out.

---------------------------------------------------------------------------------------------
Image picture = new Image();
if (objItem["DocIcon"] == null)
{
picture.ImageUrl = @"_layouts\Images\" + "ICgen.gif";
}
else
{
picture.ImageUrl = @"_layouts\Images\" + "IC" + objItem["DocIcon"].ToString() + ".gif";
}
---------------------------------------------------------------------------------------------

Consider picture as asp Image control, If you have noticed that if sharepoint does not have icon matching with the document type then it puts one white paper kind of icon and the name of that icon is ICgen.gif. so we have done same thing, if sharepoint does not have any supported icon for that document type, it will give objItem["DocIcon"] null. so we have also checked that and places the proper URL, and if we found that then we make combination of "IC" + objItem["DocIcon"].ToString() which is extension + ".gif" which is default extension of any images of sharepoint.That's it. your job is done.

September 12, 2009

Resize Quick Launch at runtime in Sharepoint

Many of us finding the solution to resize the Quick Launch on Sharepoint site. I have found the one javascript which is used to resize the Quick Launch.


But the changes is temperary when you refresh the page the changes wich we have made is not reflected.


The Script for this is as follows...

var _tk_spDragProps = new Object();

function _tk_setGrab()
{
try
{
var oNavigation = document.getElementById("LeftNavigationAreaCell");

if (oNavigation == null) return;

var oDivider = oNavigation.nextSibling;
oDivider.style.cursor = "col-resize";
oDivider.onmousedown = _tk_spStartDrag;
_tk_findNavContainers(oNavigation);

_tk_spDragProps.element = oNavigation.nextSibling;
_tk_spDragProps.sidePanel = oNavigation;
_tk_spDragProps.element.nextSibling.style.width = "0px";
_tk_spDragProps.element.style.width = "5px";
_tk_spDragProps.element.nextSibling.nextSibling.style.width = "5px";

var width = _tk_getNavWidthCookie();
if (width != null)
{
_tk_setContainerWidths(width);
_tk_spDragProps.dragStartLeft = width;
}
}
catch (e)
{
alert(e.message);
}
}

function _tk_findNavContainers(e)
{
for (var c=0; c<e.children.length; c++)
{
var oChild = e.children[c];

if (oChild.id.indexOf("TreeViewNavigationManager") > 0)
_tk_spDragProps.navMan = oChild;

if (oChild.id.indexOf("TreeViewRememberScroll") > 0)
{
_tk_spDragProps.navScroll = oChild;
return;
}
_tk_findNavContainers(oChild);
}
}

function _tk_spStartDrag(e)
{
_tk_sp_startDrag(window.event);
}

setTimeout("_tk_setGrab()", 50);

function _tk_sp_startDrag(e)
{
var x = e.clientX + document.documentElement.scrollLeft + document.body.scrollLeft;
_tk_spDragProps.mouseX = x;
_tk_spDragProps.dragStartLeft = parseInt(_tk_spDragProps.sidePanel.style.width, 10);

if (isNaN(_tk_spDragProps.dragStartLeft)) _tk_spDragProps.dragStartLeft = 150;

_tk_spDragProps.element.style.zIndex = ++_tk_spDragProps.zIndex;

document.attachEvent("onmousemove", _tk_sp_dragMove);
document.attachEvent("onmouseup", _tk_sp_dragEnd);
window.event.cancelBubble = true;
window.event.returnValue = false;
}

function _tk_setContainerWidths(width)
{
_tk_spDragProps.sidePanel.style.width = width + "px";

if (_tk_spDragProps.navScroll != null)
_tk_spDragProps.navScroll.style.width = _tk_spDragProps.sidePanel.style.width;

if (_tk_spDragProps.navMan != null)
_tk_spDragProps.navMan.style.width = _tk_spDragProps.sidePanel.style.width;
}

function _tk_sp_dragMove()
{
var x = window.event.clientX + document.documentElement.scrollLeft + document.body.scrollLeft;
var width = (_tk_spDragProps.dragStartLeft + x - _tk_spDragProps.mouseX);
if (width < 150) width = 150;

_tk_setContainerWidths(width);

window.event.cancelBubble = true;
window.event.returnValue = false;
}

function _tk_getNavWidthCookie()
{
var oCookies = document.cookie;
var arCookies = oCookies.split(";");
for (var c=0;c <arCookies.length; c++)
{
var arCookie = arCookies[c].split("=");
if (arCookie[0].replace(/^\s+\s+$/g, '') == "tkNavWidth")
return arCookie[1];
}

return null;
}

function _tk_setNavWidthCookie(width)
{
document.cookie = "tkNavWidth=" + width + "; path=/";
}

function _tk_sp_dragEnd()
{
_tk_setNavWidthCookie(parseInt(_tk_spDragProps.sidePanel.style.width));
document.detachEvent("onmousemove", _tk_sp_dragMove);
document.detachEvent("onmouseup", _tk_sp_dragEnd);
}

August 28, 2009

Translate page in your language.

Hi All,

Here in my blog you can read the post in your known languages. This is possible with the help of Bing Translator.


It provides languages such as,


Arabic,
Chinese Traditional,
Chinese Simplified,
Dutch,
French,
Germen,
Hebrew,
Italian,
Japanese,
Korean,
Polish,
Portugese,
Russian,
Spanish.

So there is no language restrication and every user can read the post and get information.
If any one wants to use this check on my blog the feature Bing Translator.

August 25, 2009

Business Data List Connector

This is a good solution provided by Layer2, which will be used as an alternate solution for BDC. It connects a REAL SharePoint List Without Any WebPart to external business data.

The following list of Databases are also connect using this feature : Microsoft SQL Server, Oracle, MySQL, Informix, DB2 etc, Microsoft Office data like Excel, Access or even text data files. Btw. connection strings are available for external SharePoint lists too...

This is free evalution version you have to register on Layer2 and able to download.

Click here to learn more...


List the Blogs on Bloggers.Com

Hi,
Many people write there blogs such as Sharepoint Blog, ASP.Net Blog, and others. Sometimes it is difficult to remember those blog names. So google provides the API for this.

It will provide Owner Name, Link to profile and list of all the blogs that owner has.


If you wants to try this yourself use the following Script.


<script src="http://www.google.com/jsapi" type="text/javascript"></script>

<script type="text/javascript">
google.load("gdata", "1.x", { packages : ["blogger"] });
</script>

<script type="text/javascript">

function _run()
{
/* Retrieve a list of blogs */
// Obtain a reference to the 'content' div

var content = document.getElementById('content');

// Create the blogger service object
var bloggerService = new google.gdata.blogger.BloggerService('com.appspot.interactivesampler');

// The default "metafeed" feed is used to retrieve a list of blogs for a particular logged-in user.

// The ID included in this URI can be retrieved from the <link rel="me"> element in the Blog's HTML source

// Hightlighted ID has to be changed as per the blog.

var feedUri = 'http://www.blogger.com/feeds/16112369086732751558/blogs';

// The callback method invoked when getBlogFeed() returns feed data
var handleBlogFeed = function(blogFeedRoot) {

// Display Blogger Profile data
var author = blogFeedRoot.feed.getAuthors();
var authorName = author[0].getName().getValue();
var authorUri = author[0].getUri().getValue();

// This variable will buffer HTML output until execution is complete
var html = '<h1>Blogger User</h1>'
+ '<h2>Profile Information</h2>'
+ '<dl>'
+ '<dt>Profile Name:</dt>'
+ '<dd>' + authorName + '</dd>'
+ '<dt>Profile Name:</dt>'
+ '<dd><a href="' + authorUri + '">' + authorUri + '</a></dd>';

// Fetch blogs associated with this Blogger Profile

html += '<h2>Blog List</h2>';
var blogEntries = blogFeedRoot.feed.getEntries();

// Has the user created any blogs?

if(!blogEntries.length)
{
html += '<p>First <a href="http://www.blogger.com" '
+ 'target="_blank">create a blog</a>.</p>';
}
else
{
// Print list of blogs
html += '<table rules="groups">'
+ '<thead><tr>'
+ '<th>Blog Name/Link</th><th>Last Updated</th>'
+ '</tr></thead>'
+ '<tbody>';

for (var i = 0, blogEntry; blogEntry = blogEntries[i]; i++)
{
var blogTitle = blogEntry.getTitle().getText();
var blogURL = blogEntry.getHtmlLink().getHref();
var blogUpdated = blogEntry.getUpdated().getValue().getDate();
html += '<tr>'
+ '<td><a href="' + blogURL + '" target="_blank">'
+ blogTitle
+ '</a></td>'
+ '<td>' + blogUpdated + '</td>'
+ '</tr>';
}

html += '</tbody>'
+ '</table>';
};

// Output buffered HTML and clear 'Loading...' messagecontent.innerHTML = html;
};

// Error handler called when getBlogFeed() produces an error
var handleError = function(error)
{
content.innerHTML = '<pre>' + error + '</pre>';
};

// Submit the request using the blogger service object
bloggerService.getBlogFeed(feedUri, handleBlogFeed, handleError);

}
google.setOnLoadCallback(_run);
</script>

<body style="font-family: Arial;border: 0 none;">
<div id="content" style="width:100%;">Loading...</div>
</body>

August 24, 2009

Deploying Web Parts in Windows SharePoint Services

Windows SharePoint Services requires that a Web Part be deployed in the Web Part gallery before it can be added to the page. This section describes differences between the bin folder and the Global Assembly Cache (GAC), security permissions considerations, how to strong name an assembly for deployment.

Deployment Considerations :

There are two primary locations within a SharePoint site where you can deploy a Web Part assembly.

1) bin directory — The bin directory is a folder stored in your Web application root directory. The location of this folder is determined when the Web site is created in Internet Information Services (IIS). In Windows SharePoint Services, this can happen either through the SharePoint 3.0 Central Administration site, or by manually creating a new Web site in IIS manager.


Important: If a bin directory does not exist you must add one manually. Do not store Web Parts in the local _app_bin directory, which is reserved for use by Microsoft.
For more information, see
How to: Find the Web Application Root


2) global assembly cache — A global location where signed assemblies can be deployed. The global assembly cache enables you to share assemblies across numerous applications. The global assembly cache is automatically installed with the .NET runtime. Components are typically stored in C:\WINNT\Assembly.


Each location has advantages and disadvantages, as described as the following


1) bin directory :


Advantages : Assemblies run with partial trust, by default. Code that runs from this directory has a low level of code access security (CAS) permissions. Because administrators must explicitly raise permissions that have been granted to a Web Part so it can function properly, they often prefer that assemblies run in the bin directory with a known set of required CAS permissions.A bin directory is specific to a Web application. This makes it possible to isolate code to a particular Web application.

Disadvantage : In order for the Web Part to run in multiple Web applications, you must deploy it to the global assembly cache.

2) global assembly cache :

Advantages : Assemblies run with full trust by default. They are globally installed, so they will work in any Web application. The global assembly cache can contain multiple versions of the same assembly.


Disadvantage : Generally no CAS restrictions on code installed to the global assembly cache; therefore, you lose the defense-in-depth security benefit.Also, an assembly deployed to the GAC is cached, so if the assembly is rebuilt, it is not automatically updated on the SharePoint site. You must force Windows SharePoint Services to reload the assembly by resetting Internet Information Services (IIS).

Security Permissions Considerations:

By default, code access security permissions for the bin directory are low; only pure execution is allowed. In most cases you need to elevate these permissions to make your assembly run correctly, for example, if your Web Part requires access to the SharePoint object model.
There are two ways to elevate permissions:

a) Recommended method — Create a new trust policy file and point your web.config file at the new file. This option is more complicated but it gives you a precise attribution of permissions for your Web Parts.
For more information about trust policy files, see Securing Web Parts in Windows SharePoint Services.

b) Optional method — Raise the net trust level of the bin directory. In the web.config file in the Web application root, there is a tag called with a default attribute of level="WSS_Minimal". You can change this level to WSS_Medium. While this option is simpler, it grants arbitrary new permissions that you might not need and is less secure than creating a new trust policy file.

Strong Naming a Web Part Assembly

Strong naming uses a private key to digitally sign an assembly. Strong naming also stamps the assembly with a public key to validate the signature. This technique guards against unauthorized versions of a Web Part. If the public key fails to validate the digital signature, Windows SharePoint Services will refuse to run the module.

When deploying a Web Part to the bin, the recommend practice is to strong name the assembly. When deploying a Web Part to the Global Assembly Cache, the assembly must have a strong name. An assembly without a strong name is not recommended in Windows SharePoint Services.

For more information: Click Here


Special Thanks to : Pasalkar, Amit

August 21, 2009

Configure Multiple Languages in MOSS

This article provides a detailed overview of the multilingual options and features available in Microsoft Office SharePoint Server 2007. It starts with the concepts and moves on with an illustration of how to actually create a complete multilingual site.


Step 1: Install the language files on all WFE Operating Systems

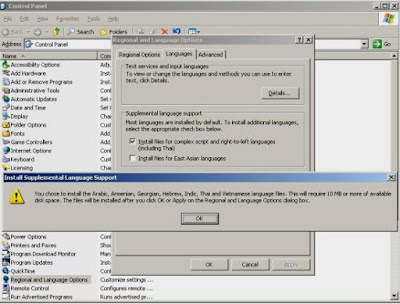
This step is necessary to install the language specific files for the operating system like the Keyboard files and fonts etc. For this, go to the Regional and Language Options in the Control Panel, in the Languages tab; add the necessary supplemental language support which installs the necessary files needed
For example, if you need to provide sites in Arabic, you need to select 'Install files for Complex Script and Right to Left Languages'


Step 2: Install Office SharePoint Server 2007

Install MOSS in the desired language and run the SharePoint Products and Technologies configuration wizard.


Step 3: Install Language Packs


Now you need to install the language pack of the desired language. Please note that language packs come in separate packages i.e. one language pack setup per installation, so if you need more than one language, multiple language packs need to be installed. Make sure the language pack is of the same language you need and you are installing the 'MOSS language pack' and not one of the 'WSS language packs'


Step 4: Rerun the SharePoint Products and Technologies Configuration Wizard

This should be done with the default options selected.
As soon as you successfully install a language pack in a particular language, a folder with the respective language ID is created in c:\Program Files\Common Files\Microsoft Shared\web server extensions\12\template\ For example: If you are currently running the English version of MOSS and you install the Arabic language pack, you will now find two folders in this hierarchy, one is 1033 (for English- the default language) and the other is 1025 (the Arabic language).


Step 5: Create the site with the new language

You should notice that the site creation wizard now includes another option to select the language to create the site in.


Step 6: Enable Site Variations

1) Go to Site Settings->Site Collection Administration
2) Click 'Variations'
3) Select '/' to create variations for the top level site
4) Leave all other options to default settings and Click 'OK'


Step 7: Configure Variation Labels

1) Go to Site Settings->Site Collection Administration
2) Click 'Variation Labels'
3) On the' Variation Labels' screen, click 'New Label' and create an English label
4) On the' Variation Labels' screen, click 'New Label' and create an Arabic label


Step 8: Create Hierarchies

1) On the' Variation Labels' screen, click 'Create Hierarchies'
2) The wizard automatically creates hierarchies for sites and sub sites and pairs them as well.


Step 9: View the Variation Log

1) Go to Site Settings->Site Collection Administration
2) Click 'Variation Logs'
3) Look at the Variation Log Entries and find the pairing of sites

Step 10: Change the Browser Language and view the site in different languages

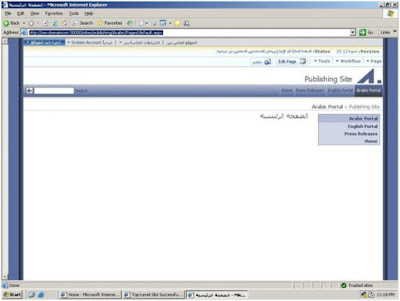
Now as the variation hierarchy is created, you can view the site in different languages (English and Arabic) in our case. For this, use the URLs you saw in the Variation Log .
One more thing to note is that if you use the default URL of the site, you will be redirected to the variation that corresponds to the default language of the browser. Try changing the browser language to Arabic and check. This shows that you can redirect different users to the same site in different languages based on user preferences.


Step 11: Edit the Page in source language and observe the results

You are now ready to go with multilingual sites created in MOSS. Try to add some content to the content editor web part by using the Edit Page option. After the change, don't forget to Publish.


After a few minutes, if you see the varied site in Arabic, you should find the same content copied there.


August 20, 2009

Disable the Source Menu Option in Internet Explorer

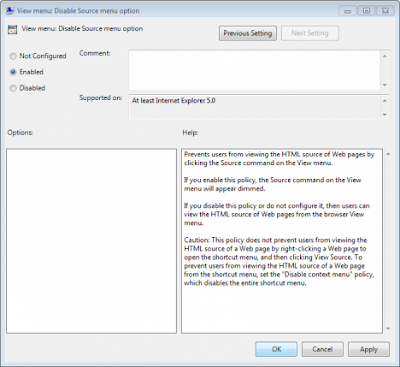
If you enable this policy, the Source command on the View menu will appear dimmed.

If you disable this policy or do not configure it, then users can view the HTML source of Web pages from the browser View menu.

Caution: This policy does not prevent users from viewing the HTML source of a Web page by right-clicking a Web page to open the shortcut menu, and then clicking View Source. To prevent users from viewing the HTML source of a Web page from the shortcut menu, set the "Disable context menu" policy, which disables the entire shortcut menu.

1) Type gpedit.msc in the Start menu’s search box and then press Enter.
Note: This guide shows you how to make changes to Windows 7 using Group Policy. Group Policy is not available in Home versions of Windows 7.

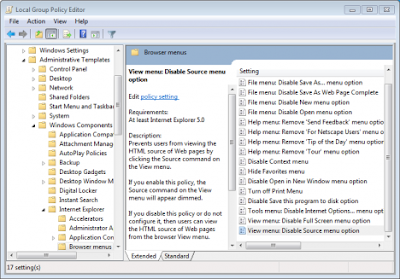
2)Navigate to User Configuration, Administrative Templates, Windows Components, Internet Explorer, and then select Browser menus in the left column of the Group Policy editor.


3) Double-click View menu: Disable Source menu option in the Settings section of the Group Policy editor.

4)Select Enable and then click OK to save the changes.

August 14, 2009

Search Images on basis of Color.

Hi, Many people wants to search images on the basis of color, and unable to find the appropriate color images. But Now google provide the API to search the images on the basis of color.


The code for this is as follows,


<script src="http://www.google.com/jsapi?key=ABQIAAAA1XbMiDxx_BTCY2_FkPh06RRaGTYH6UMl8mADNa0YKuWNNa8VNxQEerTAUcfkyrr6OwBovxn7TDAH5Q"></script>
<script type="text/javascript">
/*
* How to search for images and filter them by color.
*/

google.load('search', '1');

function OnLoad() {
var searchControlDiv = document.getElementById("content");
var control = new GSearchControl();
control.setResultSetSize(GSearch.LARGE_RESULTSET);
control.setLinkTarget(GSearch.LINK_TARGET_PARENT);

var options = new GsearcherOptions();
options.setExpandMode(GSearchControl.EXPAND_MODE_OPEN);

var isearcher;
var colors = [
GimageSearch.COLOR_RED,
GimageSearch.COLOR_ORANGE,
GimageSearch.COLOR_YELLOW,
GimageSearch.COLOR_GREEN,
GimageSearch.COLOR_TEAL,
GimageSearch.COLOR_BLUE,
GimageSearch.COLOR_PURPLE,
GimageSearch.COLOR_PINK,
GimageSearch.COLOR_WHITE,
GimageSearch.COLOR_GRAY,
GimageSearch.COLOR_BLACK,
GimageSearch.COLOR_BROWN
];

for (var i=0; i < colors.length; i++) {
var colorSearcher = new google.search.ImageSearch();
colorSearcher.setRestriction(GimageSearch.RESTRICT_COLORFILTER,
colors[i]);
var colorName = colors[i].substring(0,1).toUpperCase() + colors[i].substring(1);
colorSearcher.setUserDefinedLabel(colorName);
control.addSearcher(colorSearcher, options);
};

// tell the searcher to draw itself and tell it where to attach
var drawOptions = new google.search.DrawOptions();
drawOptions.setDrawMode(google.search.SearchControl.DRAW_MODE_TABBED);
control.draw(searchControlDiv, drawOptions);
control.execute("");
}

google.setOnLoadCallback(OnLoad);
</script>
<style type="text/css" media="screen">
body, table, p{
background-color: white;
font-family: Arial, sans-serif;
font-size: 13px;
}

.gsc-trailing-more-results {
display : none;
}

.gsc-resultsHeader {
display : none;
}

.gsc-results {
padding-left : 20px;
}

.gsc-control {
width : 800px;
}

.gsc-tabsArea {
margin-bottom : 5px;
}
</style>
</head>
<body style="font-family: Arial;border: 0 none;">
<div id="content"> Loading...</div>
</body>

August 11, 2009

Enlarge Image on Mouse Move.

Hi This is another interesting post. In this post i include how to enlarge the image on mouse move.

At start the image is look like as,


and on mouse move on the image the image will enlarge as,


The code for this is ,
Place the Style tag in head Section of page.

<style type="text/css">
img.expando
{
border: none;
vertical-align: top;
}
</style>


Place the following code in body section.


<img class="expando" border="0" src="Grow.jpg" width="100" height="80">
<Script type="text/javascript">
if (document.images)
{
(function()
{
var cos, a = /Apple/.test(navigator.vendor), times = a? 20 : 40, speed = a? 40 : 20;
var expConIm = function(im)
{
im = im window.event;
if (!expConIm.r.test (im.className))
im = im.target im.srcElement null;
if (!im !expConIm.r.test (im.className))
return;
var e = expConIm,
widthHeight = function(dim)
{
return dim[0] * cos + dim[1] + 'px';
},
resize = function()
{
cos = (1 - Math.cos((e.ims[i].jump / times) * Math.PI)) / 2;
im.style.width = widthHeight (e.ims[i].w);
im.style.height = widthHeight (e.ims[i].h);
if (e.ims[i].d && times > e.ims[i].jump)
{
++e.ims[i].jump;
e.ims[i].timer = setTimeout(resize, speed);
}
else if (!e.ims[i].d && e.ims[i].jump > 0)
{
--e.ims[i].jump;
e.ims[i].timer = setTimeout(resize, speed);
}
},
d = document.images, i = d.length - 1;
for (i; i > -1; --i)
if(d[i] == im) break;
i = i + im.src;
if (!e.ims[i])
{
im.title = '';
e.ims[i] = {im : new Image(), jump : 0};
e.ims[i].im.onload = function()
{
e.ims[i].w = [e.ims[i].im.width - im.width, im.width];
e.ims[i].h = [e.ims[i].im.height - im.height, im.height];
e (im);
};
e.ims[i].im.src = im.src;
return;
}
if (e.ims[i].timer) clearTimeout(e.ims[i].timer);
e.ims[i].d = !e.ims[i].d;
resize ();
};

expConIm.ims = {};

expConIm.r = new RegExp('\\bexpando\\b');

if (document.addEventListener)
{
document.addEventListener('mouseover', expConIm, false);
document.addEventListener('mouseout', expConIm, false);
}
else if (document.attachEvent)
{
document.attachEvent('onmouseover', expConIm);
document.attachEvent('onmouseout', expConIm);
}
})();
}
</script>

Spotlight On Image.

Hi, This is some interesting and cool post. You can show image in black and as you move the mouse over the image the light will show the image glow and clear. I also include the screenshots for proper understanding.


Copy the style in head section on page.
<style type="text/css">
#myimage
{
  filter:light
}
</style>


And Then Copy the following section in body section,

<img id="myimage" src="Grow.jpg" />
<script type="text/javascript" language="javascript">
s = 100; // the size of the spotlight
vp = 10; // the visibility percent of the picture
startx = 0; // the top position of your sportlight into the image (on start)
starty = 0; // the left position of your spotlight into the image (on start)
var IE = document.all?true:false

function moveL()
{
xv = tempX;
yv = tempY;
myimage.filters.light.MoveLight(1,xv,yv,s,true);
}

if (IE&&myimage.filters)
document.all.myimage.onmousemove = getMouseXY;
var tempX = 0
var tempY = 0

function getMouseXY(e)
{
tempX = event.offsetX
tempY = event.offsetY
if (tempX < 0) {tempX = 0} if (tempY < 0) {tempY = 0} if (t) { moveL(); } return true } var xv = startx; var yv = starty; var t= true; if (IE&&myimage.filters) { myimage.style.cursor="hand"; myimage.filters.light.addAmbient(255,255,255,vp) myimage.filters.light.addPoint(startx,starty,s,255,255,255,255) } </script>

Disable Right Click On Images.

Many people wants that there photo's or images are not to be copied by other persons which are web. So here is solution which can disable right click on Images.


The Following script is used to Disable the right click on all Images which are present on your site.

If you are working on Sharepoint site place this script on MasterPage, Otherwise on page on which you want to disable right click on images. But It will disable right click on all the Images for site/page.

<script language="JavaScript">

var clickmessage="Right click disabled on images!"
function disableclick(e)
{
if (document.all)
{
if (event.button==2event.button==3)
{
if (event.srcElement.tagName=="IMG")
{
alert(clickmessage);
return false;
}
}
}
else if (document.layers)
{
if (e.which == 3)
{
alert(clickmessage);
return false;
}
}
else if (document.getElementById)
{
if (e.which==3&&e.target.tagName=="IMG")
{
alert(clickmessage)
return false
}
}
}

function associateimages()
{
for(i=0;idocument.images[i].onmousedown=disableclick;
}

if (document.all)
document.onmousedown=disableclick
else if (document.getElementById)
document.onmouseup=disableclick
else if (document.layers)
associateimages()
</script>

August 7, 2009

English To Hindi / Marathi / Gujarati Translator.

Hi All,

Many of us are facing problem how to translate the English word in Hindi or Marathi or Gujarati, so google provides the solution as,


The Google provides the API and scripts, as follows.


<script src=http://www.google.com/jsapi?key=ABQIAAAA1XbMiDxx_BTCY2_FkPh06RRaGTYH6UMl8mADNa0YKuWNNa8VNxQEerTAUcfkyrr6OwBovxn7TDAH5Q>
</script>

<script type="text/javascript">
google.load("elements", "1",
{
packages: "transliteration"
});

function OnLoad()
{

var content = document.getElementById('content');
// Create the HTML for our text area

content.innerHTML = ' <div>Type a word and hit space to get it in Hindi. '
+'Click on a word to see more options.</div>'
+'<textarea id="transliterateTextarea" rows="5" cols="100"></textarea>'
+' <div>Type in (do not copy/paste): '
+'<b>namaste main yahan apke madad karane ke liye hun</b></div>';

var options =
{
sourceLanguage:
google.elements.transliteration.LanguageCode.ENGLISH,
destinationLanguage:
[google.elements.transliteration.LanguageCode.HINDI], // Hindi, Marathi, Gujarati.
shortcutKey: 'ctrl+g',
transliterationEnabled: true
};

// Create an instance on TransliterationControl with the required
// options.


var control = new google.elements.transliteration.TransliterationControl (options);

// Enable transliteration in the textbox with id
// 'transliterateTextarea'.

control.makeTransliteratable(['transliterateTextarea']);
}
google.setOnLoadCallback(OnLoad);
</script>

<body style="font-family: Arial;border: 0 none;"> </body>

August 5, 2009

SharePoint’s Branding Limitations


Many people having problems regarding branding of their site, but now here is solution by which we can design our own site.


There are four posts from SharePoint Magazine.


Style for Webparts

Here is the style for web parts in sharepoint page.


<Style>
   .ms-WPBorder
   {
      border-right:#6C1717 1px solid;
      border-left:#6C1717 1px solid;
      border-top:blue 2px groove;
      border-bottom:#6C1717 1px solid;
   }

   .ms-PartSpacingVertical, .ms-PartSpacingHorizontal
   {
      padding-top:1px;
   }

   .ms-WPHeader
   {
      Color:#FFF;background-image:url   ('images/topshape.jpg');
   }

   .ms-WPTitle span
   {
      font-weight:bold;
      font-size:13px;
      font-family:Arial, Helvetica, sans-serif;
      text-decoration:none;
      margin-left:8px;
      Color:#3366FF;
   }
</Style>

August 3, 2009

Item-Level Auditing with SharePoint Server 2007

Many companies and government agencies have policies and regulations that require them to track carefully where and how users gain access to important records and documents. In particular, they need to maintain audit logs that detail events that track data such as which users viewed and updated records and documents, and when these events occurred. Now the solution is available with MOSS. Click here

July 31, 2009

Search Online using Various Search Engine in one part.

In regular life we wnat to search something on google or yahoo or any other search engine. For this we want to open IE, but now the following code snippet is used for add the search in your site.
It will provide the search result found at Web, Yahoo.com, Google and Various Blogs arrange in tab format.


<link href="http://www.google.com/uds/css/gsearch.css" type="text/css" rel="stylesheet" />
<script src="http://www.google.com/uds/api?file=uds.js&v=1.0&key=ABQIAAAAbKU1_TiGJxAPxQNRN0Z7thQEKx5ztgmPnP8AiUB_ZtaZmH_j4xR_bAGbjyG4GamffxBhkZcRXMQE0A"
type="text/javascript">
</script>
<script type="text/javascript">
var searchControl;
window.onload = function() { onLoad(); }
function onLoad()
{ // Create a search control
searchControl = new GSearchControl(); // add a regular web search, with a custom label 'web'
var webSrearch = new GwebSearch();
webSrearch.setUserDefinedLabel("web");
searchControl.addSearcher(webSrearch); // add a site-limited web search, with a custom label
var siteSearch = new GwebSearch();
siteSearch.setUserDefinedLabel("Yahoo.com");
siteSearch.setSiteRestriction("Yahoo.com");
searchControl.addSearcher(siteSearch); // add a site-limited web search, with a custom label
var siteSearch = new GwebSearch();
siteSearch.setUserDefinedLabel("Google.com");
siteSearch.setSiteRestriction("Google.com");
searchControl.addSearcher(siteSearch); // add a blog search, with a custom label
var blogsSrearch = new GblogSearch();
blogsSrearch.setUserDefinedLabel("weblogs");
searchControl.addSearcher(blogsSrearch); // setting the draw mode for the Google search
var drawOptions = new GdrawOptions(); // use tabbed view
drawOptions.setDrawMode(GSearchControl.DRAW_MODE_TABBED); // set the input field (instead of the default one)
drawOptions.setInput(document.getElementById('query')); // actually write the needed markup to the page searchControl.draw(document.getElementById("searchcontrol"), drawOptions); // set the google logo container GSearch.getBranding(document.getElementById("branding"));
}

var query = null;
document.onkeydown = function(event)
{ kd(event); };


function kd(e)
{ // make it work on FF and IE
if (!e) e = event; // use ESC to clear the search results
if (e.keyCode == 27)
searchControl.clearAllResults(); // get the input field
if (query == null) query = document.getElementById('query'); // and move the focus in there
query.focus();
}
</script>


<style type="text/css">
body { font-family: verdana; text-align: center; }
#queryContainer { margin-bottom:2em; width: 80%; margin-left:auto; margin-right:auto; }
#query { border:1px solid silver; width: 100%; }
#searchcontrol { width:80%; margin-left:auto; margin-right:auto; text-align:left; }
.gsc-control { width: 100%; }
</style>
</head>
<body>
<h1>Search</h1>
You can type anywhere on the page, and the search results will be updated. <br />
Use ESC key to clear the search results <br /> <br />
<div id="queryContainer"> <input type="text" name="query" id="query" />
<br /> <div id="branding">Powered by Google</div>
</div> <div id="searchcontrol"></div>
</body>

Script for Add Buttons for Site Action Menu.

Hi,Many folks face problem once the SharePoint portal is authorized; many eliminate the option of removing the site action menu from master page. Many occasions accrue when one is suppose the edit the web parts or the page contents, everything using designer is also not fissile. Here is a simple script which can be added in the required page as a Content Editor WebPart which can help you in further alterations in future.


< !--Code-- >

<style>

#ContentTypeToolbar table
{
background-color: #BFDBFF !important;width: 100%;
}


td button
{
padding: 3px 7px 4px 7px !important; border: 1px solid
#A0BECE; font-family: Verdana; background-color: transparent; height:auto; width:auto;
xoverflow:visible; margin: 0px 1px 0px 1px !important;
}

</style>


<div id="ContentTypeToolbar" style="background-color:#93BCF;"></div>

<script>

window.attachEvent("onload", new Function("NewButtons_OnLoad();"));

function NewButtons_OnLoad()

{

try

{
var aTags = document.getElementsByTagName("IE:MENUITEM");
var sToolbar='<table
class="ms-menutoolbar" cellSpacing="0" cellPadding="2" width="100%" border="0" >

<tr><td>';


// For Each Menu Item
for(var j=0;j< aTags.length;j++)
{
var aTag = aTags[j];
// Only Process the items from the _New And _settings Menu (ignore Actions)
if(aTag.getAttribute("id").toLowerCase().indexOf("_siteaction")>=0)
{
var BtnText=aTag.getAttributeNode("text").value;
var OnMenuClick=aTag.getAttributeNode("onMenuClick").value;
var IconSrc=aTag.getAttributeNode("iconSrc").value;
var Description=aTag.getAttributeNode("description").value; // Add the Button with
an Image.
sToolbar=sToolbar+'<button class="ms-menubuttoninactivehover"
onmouseover="MMU_EcbTableMouseOverOut(this, true)"
onClick="'+OnMenuClick+'" title="'+Description+'" hoverInactive="ms-menubuttoninactivehover"
hoverActive="ms-menubuttonactivehover">
<img style="height:22px;width:22px;" align="absmiddle" src="'+IconSrc+'">'+BtnText+'</button>';
}//end of if

if(aTag.getAttribute("id").toLowerCase().indexOf("_settings")>=0)

{
var BtnText=aTag.getAttributeNode("text").value;
var OnMenuClick=aTag.getAttributeNode("onMenuClick").value;
var IconSrc=aTag.getAttributeNode("iconSrc").value;
var Description=aTag.getAttributeNode("description").value; // Add the Button
with an Image.
sToolbar=sToolbar+'<button class="ms-menubuttoninactivehover"
onmouseover="MMU_EcbTableMouseOverOut(this, true)"
onClick="'+OnMenuClick+'" title="'+Description+'" hoverInactive="ms-menubuttoninactivehover"
hoverActive="ms-menubuttonactivehover">
<img style="height:22px;width:22px;" align="absmiddle" src="'+IconSrc+'">'+BtnText+'</button>';
}//end of if
} // End For
sToolbar=sToolbar+'<td class="ms-toolbar" noWrap width="1%" >
<img class="icon"
height="18" alt="" src="../../_layouts/images/blank.gif" width="1">
</td>
<td class="ms-toolbar" noWrap align="right">
<
button onclick="CTWPAbout()" style="background-color:transparent;border:0;cursor:hand;">
<img src="/_layouts/images/helpicon.gif"></button>
</td>
</tr>
</table>';

if (document.location.href.indexOf('codeexport') >0)
{
sToolbar='<textarea rows="5">'+sToolbar+'</textarea>';
}
document.getElementById("ContentTypeToolbar").innerHTML=sToolbar;
} // try
catch (e)
{ window.status=e.description;
} // catch
}
function CTWPAbout()
{
var sAbout='by Vinay Patil\n\nCopyright 2009\n ';
alert(sAbout);
}

Change the Style of Banner and Quick Launch

Here is the solution to change the style of NavFrame, NavWatermark, Bannerframe.
You have to enclose the following lines in
tag.

.ms-navframe
{ filter:progid:DXImageTransform.Microsoft.gradient(startColorstr='#0274CC', endColorstr='#FFFFFF', gradientType='0')}

.ms-navwatermark
{ display: none; }

.ms-bannerframe
{filter:progid:DXImageTransform.Microsoft.gradient(startColorstr='#0274CC', endColorstr='#FFFFFF', gradientType='1')}

#onetidPortalConn
{ display: none; }